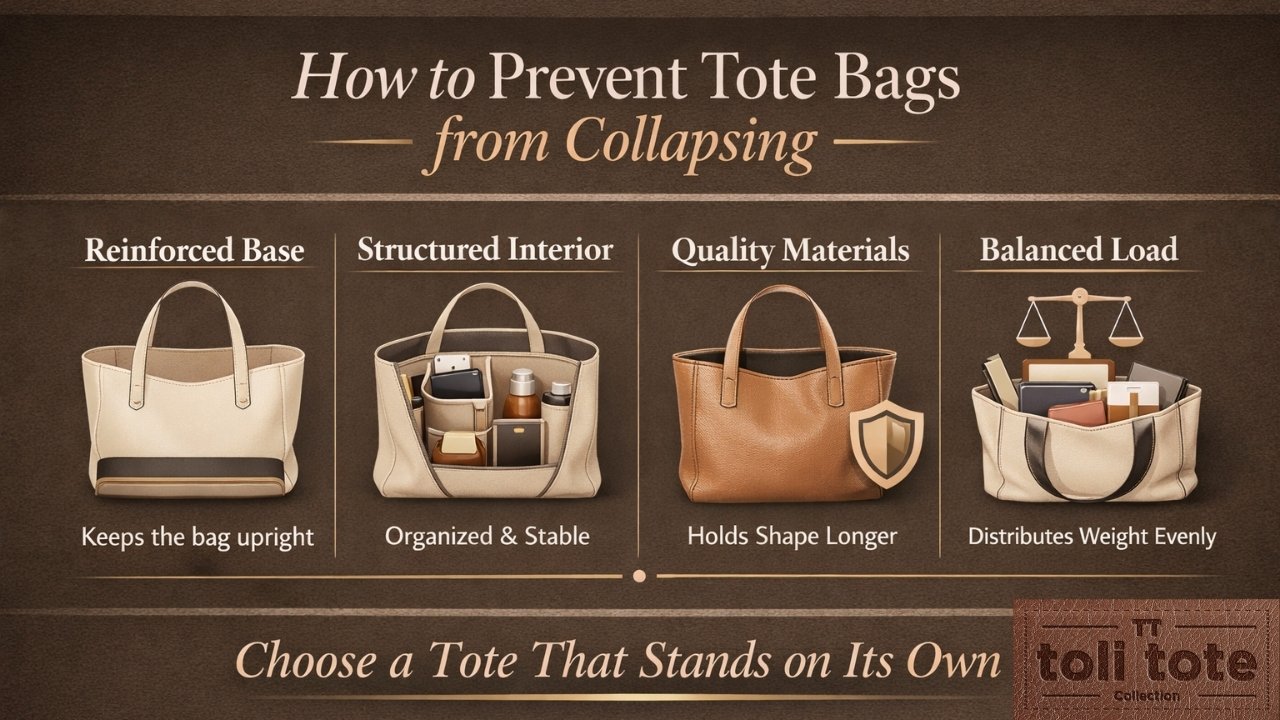
Have you ever struggled to keep things secure in your favorite tote bag? Are you tired of your belongings slipping out when your bag tips over? Adding a zipper is the perfect solution, and guess what? You can sew it at home, even if you’re a beginner!
This guide will show you how to sew a zippered tote bag using simple language, easy steps, and a pattern-free method. Whether you’re crafting your first bag or upgrading an old favorite, this tutorial has everything you need.
What You’ll Need – Supplies Checklist
Before you dive into sewing, gather the following materials:
- ½ yard canvas or cotton fabric (for outer layer)
- ½ yard lining fabric (optional: waterproof nylon)
- 14–16 inch nylon zipper (matching or contrast color)
- Thread (matching your fabric)
- Scissors or a rotary cutter
- Sewing machine
- Pins or clips
- Measuring tape
- Iron (for crisp edges)
Step-by-Step Guide: Sewing a Zippered Tote Bag
Step 1: Cut the Fabric Pieces
- Main fabric: Cut two rectangles (16″ x 14″)
- Lining fabric: Cut two rectangles (16″ x 14″)
- Straps: Cut two strips (22″ x 2.5″) from canvas or cotton
- Zipper tabs: Cut 2 small rectangles (2″ x 2″)
Pro Tip: Use interfacing if your fabric is thin; it adds structure.
Step 2: Prepare and Attach the Zipper
- Fold zipper tabs in half and attach to both ends of your zipper.
- Sandwich the zipper between one outer fabric and one lining (right sides together), and sew along the top edge.
- Flip and press. Topstitch close to the edge.
- Repeat with the other side of the zipper using the remaining outer and lining pieces.
Goal: Unzipped, you should see the lining inside and the zipper neatly sewn in between.
Step 3: Sew the Bag Body
- Open the zipper halfway (very important).
- Match the outer fabric pieces right sides together and do the same with the lining.
- Sew around the edges, leaving a 3–4″ gap in the lining’s bottom for turning.
- Clip the corners for sharper edges.
Step 4: Box the Corners (Optional but Professional)
- Flatten each bottom corner to form a triangle.
- Measure 2 inches from the tip, draw a line, and sew across.
- Cut the excess fabric, leaving ¼ ¼-inch seam.
Step 5: Add the Handles
- Turn the bag right-side out through the lining gap.
- Stitch the gap closed.
- Press the top of the tote and pin the straps 4″ from each side.
- Sew a square with an X to secure each strap.
Step 6: Final Touches
- Give the tote a final press with your iron.
- Check zipper functionality.
- Optional: Add inner pockets or key loops.
Boom! You just made your tote bag with a zipper. Stylish. Functional. Secure.
Design Ideas to Make It Uniquely Yours
- Embroider your initials or a floral motif.
- Use patterned lining for a surprise pop of color.
- Add leather straps for a luxury feel.
- Mix and match fabrics (denim, linen, or recycled materials).
Don’t Have Time to Sew? Try Our Ready-Made Totes
If DIY isn’t your thing (or you love effortless style), skip the hassle and check out the curated collection at Toli Tote.